

Instrucciones de instalación de paneles acústicos de madera
Realce sus interiores fácilmente. Ya sea su sala de estar, su oficina en casa, su jardín o cualquier espacio interior, cree un ambiente refinado y lujoso en tan solo unas horas con los paneles acústicos de madera DECOHUB . Diseñados para una instalación sencilla, nuestra guía paso a paso le ayuda a lograr un estilo de diseño con el mínimo esfuerzo.
Antes de comenzar la instalación
- Medir y planificar: mida con precisión el área donde se instalarán los paneles y planifique con antelación el diseño y la disposición deseados.
- Pida suficientes paneles: Asegúrese de comprar suficientes paneles para cubrir toda la superficie. Debido a la chapa de madera natural, pueden presentarse ligeras variaciones de color entre lotes.
- Prepare la superficie: Retire tornillos, clavos u otros elementos de fijación. Rellene los agujeros y lije la superficie para crear una base lisa y uniforme.
- Limpiar a fondo:
Limpie el área de instalación con un paño húmedo para eliminar el polvo y los residuos. Deje que la superficie se seque completamente antes de comenzar la instalación.

Notas importantes:
- Utilice una sierra de dientes FINOS para cortar láminas de paneles.
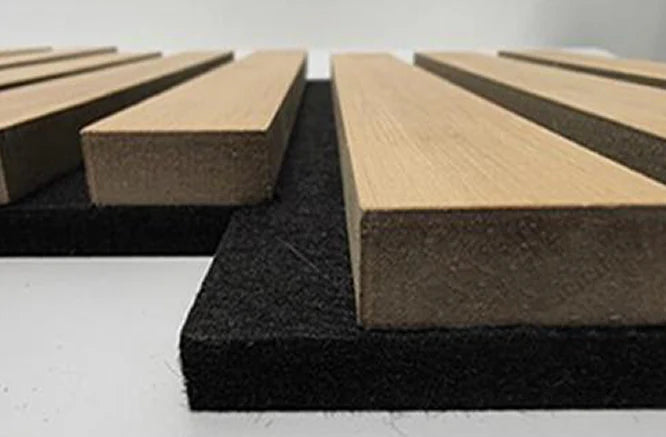
- Utilice un cuchillo afilado para cortar el respaldo de fieltro de los paneles.
- Utilice tornillos negros de 35 mm
- Si se utilizan listones, estos deben ser de 45 mm y colocarse cada 45 cm entre centros.
- Se puede utilizar un rollo de aislamiento de 45 mm entre listones para un mejor rendimiento acústico.
- Para techos, atornillar directamente a las vigas.
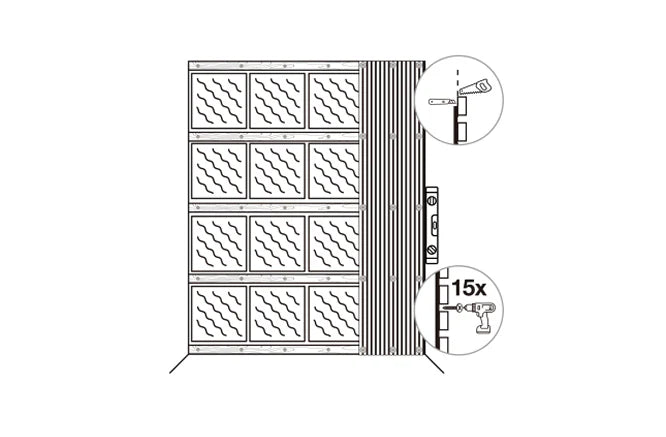
- Si agrega accesorios y herrajes (por ejemplo, estantes o soportes para TV), perfore el panel y la subpared y use fijaciones adecuadas.
- Los cortes intrincados para enchufes, interruptores de luz, etc. deben realizarse utilizando una sierra caladora eléctrica o una herramienta multiusos.
Instalación con adhesivo líquido para uñas

1. Mida la altura de la pared de instalación. Si necesita cortar paneles, márquelos con un lápiz y una escuadra (¡recuerde medir DOS VECES, cortar una!). Corte los paneles a la medida con una sierra de mano o una sierra circular de dientes FINOS. Si también necesita cortar los paneles a lo ancho, puede usar una cuchilla afilada para cortar el respaldo de fieltro.
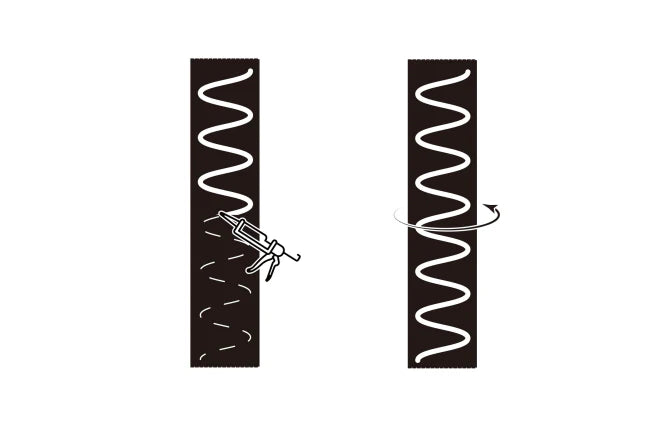
2. Usando un adhesivo líquido para uñas y una pistola de calafateo, aplique el adhesivo en la parte posterior del panel manteniendo el adhesivo a un mínimo de 50 mm de los bordes del panel, asegurándose de que todo el panel tenga una cobertura uniforme para asegurar una buena adherencia a la superficie.
3 Mida la altura de la pared de instalación. Si necesita cortar paneles, márquelos con un lápiz y una escuadra (¡recuerde medir dos veces, cortar una!). Corte los paneles a la medida con una sierra de mano o una sierra circular de dientes finos. Si también necesita cortar los paneles a lo ancho, puede usar una cuchilla afilada para cortar el respaldo de fieltro.
4 Instale el segundo panel y los subsiguientes utilizando el sistema de ranuras para tarjetas de fácil instalación para mantener un acabado uniforme. Continúe hasta que todos los paneles estén en su lugar.
Instalación mediante tornillos
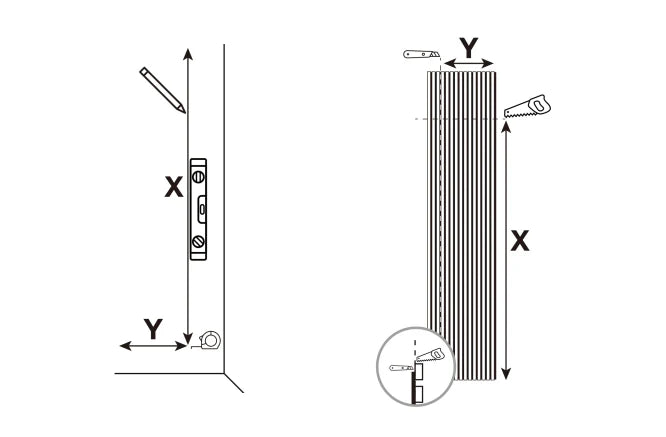
1 Mida la altura de la pared de instalación. Si necesita cortar paneles, márquelos con un lápiz y una escuadra (¡recuerde medir dos veces, cortar una!). Corte los paneles a la medida con una sierra de mano o una sierra circular de dientes finos. Si también necesita cortar los paneles a lo ancho, puede usar una cuchilla afilada para cortar el respaldo de fieltro.
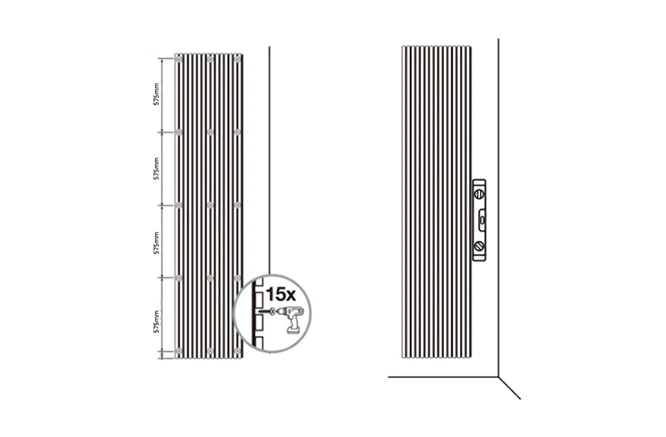
2 Marque los puntos de fijación en la superficie de instalación en 5 filas de tres, con una separación aproximada de 575 mm, y asegúrese de que los puntos de fijación exteriores estén a una distancia mínima de 50 mm del borde del panel. Taladre e inserte los elementos de fijación adecuados. Fije el panel a la superficie con tornillos negros de 35 mm.

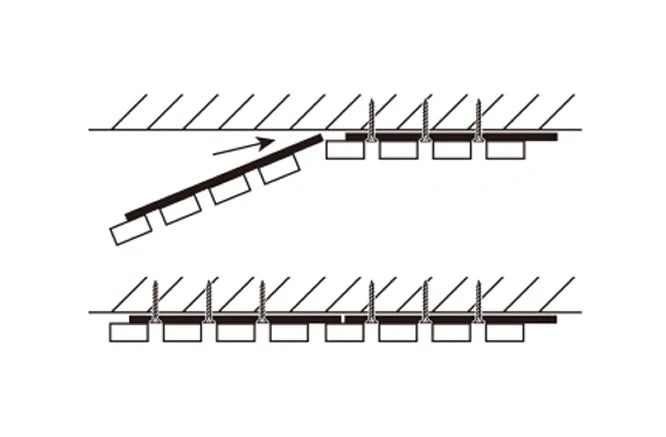
3 Instale el segundo panel y los subsiguientes utilizando el sistema de ranuras para tarjetas de fácil instalación para mantener un acabado uniforme. Continúe hasta que todos los paneles estén en su lugar.
Para un mejor rendimiento acústico (hasta clase A)
Para mejorar el rendimiento acústico, instale paneles sobre listones fijos.
LuxeLayer recomienda listones de 45 mm de profundidad fijados a centro. Los paneles se pueden atornillar directamente con tornillos negros de 35 mm.
Para mejorar aún más el rendimiento acústico, se puede insertar un aislamiento de lana mineral de 45/50 mm en la cavidad.
